Sunday
13th
December, 2015
Since
we have a free day in Picton due to having arrived a day earlier than
intended (all of the Interisland Ferry Sailings for Sunday were
booked out due to an AC/DC concert in Wellington last night), Dominic
and I decide to go for a walk to limber up in preparation for the
proper walk. We head out along from the Marina towards The Snout but
not before I stop in at a shop on High Street to buy a sun hat which
I had forgotten to pack.
The
walk to The Snout is quite pleasant as it parallels the Sound walking
mainly through bush. It is a warm and pleasant day too. We turn
around before reaching The Snout as there seems to be a lot of
downhill to get to it and that will, inevitably, turn into uphill on
the way back. We are probably only about 500 metres short of it
anyway.
Walking
back we take a different route down
on the Waikawa Bay side of the peninsula. This takes us onto Waikawa
Road back towards Picton where we find ourselves walking into the
teeth of a gale – although they probably only consider it to be a
light breeze here. The
day's walking took us over about 14.5 km not counting walking around
in Picton itself so
it is a good warm up for what is to come.
Later
on, after
cleaning up and resting for a while at the Glengary B & B,
we head out to Cafe Cortado for dinner. We get talking to a couple
from
Melbourne at
the next table who, it turns out, are also starting the Queen
Charlotte Track walk tomorrow but not as a guided option like ours.
They will also be staying at different accommodation
on the first night.
Monday
14th
December, 2015
This
morning, while we are at breakfast at the B & B, I make sure to
contact Leonore in Masterton to talk to Patricia so that I can wish
her happy wedding anniversary – 52 years ago today.
Ray,
our guide for the walk, arrives to pick us up from the B & B and
take us to the Adventure Company office. When we arrive
there is just time to be issued with essentials – labels and lunch
boxes etc, and
have a photograph taken,
before we have to board the boat. We
also meet the other member of our party, Scott – a younger American
guy who is coming along as a trainee guide to learn the track. So
our party is just the four of us: Dominic, myself, Ray, and Scott.
Dominic, Scott, Me, Ray before the boat trip to the QCT walk
The
boat
to Motuara Island is
a pleasant trip and once there, we
walk to the
top
of
the Island seeing
NZ Robins and Native Pigeons on the way. We
also
see
a
Penguin in a nesting box. On the way to the island we saw a
school/pod of Dusky Dolphins fishing in the Sound and
they seemed to be having a good time of it.
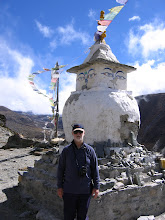
View of Queen Charlotte Sound from Motuara Island
After
leaving Motuara Island we take the boat across
to Ship Cove named by Captain
Cook in 1770. Ship
Cove is where we will
start the
walk. While
there we looked
at the
Captain Cook
Memorial before starting the
walk.
The
walk
takes
us through
thick bush and up
over Ship
Cove
Saddle
then down to Schoolhouse Bay for lunch. After
lunch we
continue
the
walk along to Furneaux Lodge via Tawa Saddle. All up, including the
Island walk it
is 19.09km,
26,830 steps in about 4.5 hours of walking on the main track and
about 0.5 hour on the Island.
At
Tawa Saddle we saw
some cheeky Wekas - one with a young'un in tow. They
don't seem to be disturbed at all by humans and behave much like
chickens.
Weka at Tawa Saddle
View from Tawa Saddle
Afterwards
my feet
are
a
bit sore in a bony pressure point (left foot) and a small blister
from yesterday's
walk
on the right foot.
Dinner
at 6:30pm is welcome and I
had a nice rib-eye steak while
Dominic had a Salmon Fillet - both very nice. Dinner
is served with a
complimentary glass of wine each so Dominic ordered a red of my
choosing which I imbibed after mine ;-)
I
had worn my Teva sandals to alleviate the soreness in my feet but on
the way back to our room after
dinner my
left sandal's
sole
disintegrated so I had to throw them out in the rubbish. They
were only 21 years old too. They just don't build things to last
these days – tcch!
During
the night I keep being disturbed by a burning sensation in my left
big toe base knuckle. Strangely it is fleeting and if I touch it or
apply pressure externally there is no pain so there is no way it can
be gout – just
some internal inflammation.
Tuesday
15th
December,
2015
The
walk for day
two
takes
us from
Furneaux Lodge to Punga Cove. We
are greeted
by Wekas and Tuis on waking
up. We
go
to bar to prepare lunches at 7:15am as per Ray's
instructions
last night
but,
unfortunately, he stuffed up and it was supposed to be 8:15! Ho
hum! It must
have been the Pinot
Noir he had with dinner.
We
left
Furneaux
Lodge at about
9:30am
after breakfast
and took a short side trip to look at some old growth Beech and Rimu
forest. The Rimu trees looked like they had been through a fire due
to a black coating on the bark but this blackness
is
caused by sooty fungus due to sugary secretions left by an insect
that burrows into the bark. Bees apparently
appreciate
this bounty too and Honey Dew honey is the result. The
remnant Beech and Rimu forest is quite interesting and has remained
intact due to the original owner of Furneaux Lodge buying up the land
to preserve it. At that time prime trees were big money and many
were felled for profit.
We
had
the
usual
morning tea stop along the way with
Ray boiling up his billy for tea. Time
for a nice quiet sit in the sunshine to reflect on the beautiful
surroundings.
Later on there was also,
of course, a
lunch stop which was welcome
after
a few hours walking.
The
walk so
far is
well protected by bush with very few exposed places. Occassionally
we can catch glimpses of the Sound from some of the higher places.
There
are
quite
a few (<12 but="" font="" on="" other="" the="" track="" walkers="">they
are
well
separated so
it still seems
a wilderness experience.
Along
the way we are
entertained
by Tuis and some other birds which
I can't
identify.
A
lot of the NZ native birds have fairly subdued (drab?) colouring
which makes them
sometimes
difficult to spot although they can usually be heard.
Altogether
for the day we do
21232
steps and 15.17km in about
4
hours of walking.
Punga
Cove Resort where we will be spending tonight is something else. It
is built on the side of a hill leading up from the jetty with average
gradients in the pathways of 15 – 20% (by my estimation) and our
room is almost at the highest point - the only thing higher is the
restaurant. Fortunately our overnight bags have already been carried
to the room for us so we don't have to lug those up the hill.
View from our room at Punga Cove Resort
Later
on, while
down in the bar using wifi (the
only place where
it
is available and
even then it is flaky)
we meet
up with the Melbourne guy that we sat next to in
Cafe Cortaldo in Picton and
have
a good chat about shared experiences on
the day's walk.
Dinner
is
again
very
pleasant. I have
Cajun Lamb Loin and Dominic has
Salmon along with Ray and Scott. And,
of course, the obligatory complimentary glass(es for
me)
of Pinot Noir.
Just
before sleep I take a paracetamol/codeine tablet so that my toe will,
hopefully, not trouble me in the night.
Wednesday
16th Dec, 2015
I
am
woken
by the alarm at 6am out of a deep sleep so
the
paracetamol
pill
I took last night really worked.
It
is a grey
day outside with cloud down low over the ridges and
threatening rain.
We
get dressed
and pack our
overnight bags then
go
down to
the bar to
prepare our lunch boxes. At
this stage I tell
Ray and the others that I am
going to take the boat to Portage instead of walking this longest leg
because
of my foot discomfort.
Just before we go
back
up
the hill to breakfast light rain starts.
After
breakfast the others start on the walk while I go
back to the room to wait for the
boat
to arrive around 9ish.
The
boat
duly
arrives
about 9:20am
and, after
an uneventful trip down the Sound,
arrives
at Torea Bay for the ride up to the Portage Hotel.
I
am
in
our room by 10:45am. On the way down
the Sound
the boat
picks
up an elderly lady at Pahau and we get
talking. It turns out that her husband and some friends were
mountain biking on one of track sections a few years ago (I'm
not
sure how many but he was 69 at the time). He was leading the
group so
he
disappeared
around a bend ahead
and when
the others caught up they found him tilted against the side of
the track,
still on his bike, and dead from a heart attack. What
a great
way to go. Another
thing that she comments on with the boat skipper is that she has been
getting some wild piglets coming into her garden and is of a mind to
catch some and pen them for fattening up. Wild pigs, descendants of
originals dropped off by Captain Cook and other sea-farers, still
abound in parts of New Zealand and are a favourite hunters target.
They still go by the soubriquet of 'Captain Cookers'.
View over Keneperu Sound from below Portage Hotel
Later
on I go
for a walk up the hill where the road intersects the Queen
Charlotte
Track.
It
is a steep
pull up but I
do
it with no stops which is
good. I
meet a young European
couple
who are trying to decide which part of the track they want to walk so
that they can catch some of the great views over the Sounds so
I tell them which way our party will be coming and they take off in
that direction.
Portage
is accessible by road from Picton but I don't know how long that
takes. The road also continues on and terminates above Punga Cove
where we spent last night.
Road intersection and road signs near Portage Hotel
Dominic,
Ray
and Scott
arrive before 4pm. Dominic
is
tired but otherwise
Ok
after a walk of 26km – partly
in the rain to
start with.
Dinner
at 6:30pm
is
(chosen from
the menu)
Chicken Curry which is
nice and spicy. We
wash it
down with a nice Pinot Noir. I also
buy
a bottle of Central Otago Roaring Meg Pinot Noir to take back to the
room as we will be here for two nights. Yummy.
Thursday
17th December, 2015
Today
is our 'rest' day so it is a latish start (8am) to prepare our lunch
and then breakfast
at
8:30am. At 10am we will meet to go on our kayaking adventure. Scott
is heading back
to
Picton by mountain bike today so we may see him once we get back to
Picton tomorrow
night.
Just
on 10am Ray arrives at our room to present us with neoprene wet shoes
and waterproof over jackets to wear in the kayak and then we follow
him down to the beach where the kayaks are waiting – his is a
single seater and ours a two-seater.
After
getting prepared with spray skirt and Personal
Floatation
Device
(PFD)
and
stowing
our lunch etc in the waterproof compartment we are off paddling
into
Keneperu Sound. Initially
I start out in the rear, steering, position but I keep losing the
steering controls from
my feet. The seating position is also very uncomfortable with not
enough back support. We head back to the beach and I swap places
with Dominic. The front seat has been 'hacked' so that it can slide
backwards and forwards so it is quite easy to set up a better sitting
position and soon we are off again.
Our
destination is a mussel farm on the far side of the Sound. The idea
is that we pick up
(ie
steal) some mussels for lunch. Apparently the mussel farm owners
don't mind mussels
being
taken from the top of the lines as these often get smashed anyway
during harvesting. We
use our kayak to hold the lines up while Ray does the harvesting.
After
Ray has collected enough we head across to the other side of
an island where there is a little
beach
where
we can have our lunch.
Dominic and Ray on the beach at our lunchtime stop
Duly
arriving at the beach we have our lunch and then Ray reuses his tea
billy
to cook the
mussels
in a little seawater. This does not take long and there are enough
for us to have a
few
each and they are delicious – they
could
not be any fresher.
After
lunch and reloading the kayaks we start to head north to
go around the top of the island to a small overland portage but
as we get near
the top of the island there are white-caps visible ahead due to the
freshening
wind. Ray decides we should
turn around and head back around the south end of the island and thus
back across the bay to the hotel. This turns out to be a lot easier
to say than to do.
Turning,
with great difficulty, around the bottom of the island we are
straight into the teeth of a gale (locally known as a stiff breeze)
and it is non-stop paddling for probably half-an-hour or so to get us
back onto the beach below the hotel.
It
is a hard slog back to our departure
point but eventually we are there,
beaching
the kayaks and getting everything ready to pack away. It
has
been
about
3.5 hours all up and, somehow, the arms have managed to survive -
although they
are very
tired from the unaccustomed workout.
Back
in our room a nice hot shower makes things feel much more normal and
then a nice coffee in the bar is very welcome. It provides a fitting
cap to the new experiences of the day as we look out over the bay
from the comfort of the hotel lounge.
At
6:30pm we experience another
good dinner at the hotel - fish chowder followed by fish of the day
(Orange Roughy) with vegetables.
Oh
– and some red wine ;-)
Friday
18th December, 2015
We
are up
early for our last leg which
is from
Portage
to Anakiwa - about 20+km.
After
preparing lunch and having breakfast the hotel minibus takes us up
the road to the
start
of the track which
avoids the boring trudge up the tarmac that I did on Wednesday.
It
is raining again
so
we are dressed in rain gear to start off.
On
the track the first hour is all uphill steeply
and
is
slow
going for me. However, the few rest stops I have to let the heart
rate drop give us a chance to take in some of the wonderful
views.
After
we reach the tops we are able to shed the
rain gear and
walk more comfortably.
At
about 11am Ray leads us on a side detour down over knarled roots
through a delightfully
spooky Beech
forest to Mistletoe Bay where he boils the billy for morning tea.
After a half-hour break we are on our way again and, you guessed it,
uphill again. When
we reach the intersection with the
QCT
there is an
indicator
post indicating 11.5km to go to
Anakiwa.
Ray
tells us to take note of this distance for when we come to the next
distance indicator post. Walking
at a pace which I estimate
conservatively
at 3kph we reach another post after 20 minutes which indicates 11km
to go – so
one
of these markers is lying! 20 minutes at 3kph = 1km and
Ray think we are probably doing more like 4kph+.
He
says that he thinks that the track needs to be resurveyed and
properly measured.
After
another half-hour or so it is time for a lunch break at a bench
overlooking the Sounds.
This
bench was apparently one that Ray was instrumental in placing when
the track was being built. It originally had a clear view over the
Sound
which was why it was placed here but, in the intervening years, the
bush has grown up to obscure the views somewhat.
After
lunch it is a downhill-on-average walk to Davies Bay where it is
about 6km to
Anakiwa.
On reaching Anakiwa we have a good, welcome coffee from the lady at
the
coffee
caravan while we wait for the Cougar Lines boat pickup.
Anakiwa
is where the NZ Outward Bound schools was established in 1962. From
some of our conversations with Ray we learned that he had done two
two-year stints as an instructor there followed by two ywo-year
stints as deputy warden.
The
boat arrives on time but we are delayed, waiting for some mountain
bikers who are running late. After about 25 minutes delay we are on
our way to our final stop in Picton. After
finalising the formalities and receiving a copy of the picture which
was taken before we started off, Dave
from the walk company gives us a lift to the ferry terminal. We
already know that the
ferry is running about an hour late, so
we
check in our bags and walk back to town for a meal.
Eventually
we settle on a pizza at the Irish pub (where
else?) -
smoked salmon which is quite nice and then head back to wait for the
ferry.
The
ferry turns out to be 2 hours late by the time we get away so it is
about 11:45pm by
the
time we get to the hotel in
Wellington.
A quick shower then into bed – zzzzzzzz!


 Proposed location of the shelving unit above the bed-head
 The support battens fixed to the wall
 Both shelving units attached to the wall
 I put a door on one unit to hide some of the messy stuff
 Completed units with internal shelves installed. Another
 A design requirement was that our heavy (Chinese manufactured) chairs should fit in between the legs at the end and underneath the rails when not in use.
 Because the top is made up from three pieces of yellow box benchtop, I decided that I would make a feature of the joints between them rather than butting them up tightly against each other. To do this I used the router to take off a 45degree arris along the adjacent edges of each of the three pieces and allow a gap of between 1 and 2mm to allow rainwater to drain through rather than ponding. It is also a little unusual in that the laminations run across the table rather than along the length as is more usual. Had I been more adventurous I might have gone for a diagonal arrangement to add interest.

 And here (below) is a picture showing the Insert Plate in place and flush with the surface.